Have you ever captured what you thought was an incredible wildlife moment, only to feel disappointed when reviewing it later on your computer? That sense of excitement on the camera screen somehow doesn't translate to the final image.
If this sounds familiar, you're definitely not alone. I've been there myself, and I've watched countless photographers experience the same frustration. The good news? Most of the time, the problem isn't your equipment or the animals you're photographing. It's often about technique, timing, and knowing a few key principles that separate average wildlife photos from truly exceptional ones.
In this comprehensive wildlife photography tips guide, I'll walk you through the seven most impactful changes you can make. These practical, field-tested wildlife photography tips work whether you're photographing elephants in Kaziranga National Park or birds at your local sanctuary. If you want to fast-track your progress, explore my wildlife photography workshops in India for hands-on field learning.
The Most Common Wildlife Photography Problems
Before we dive into these wildlife photography tips, let's identify what's actually holding your photos back. Understanding these challenges is the first step to overcoming them.
-
1. Harsh Midday Light Kills Your PhotosStanding under the bright midday sun creates the worst possible lighting conditions for wildlife photography. Your images come out flat and lifeless, with animals losing crucial detail in their fur or feathers. Meanwhile, shadows become pitch black, creating harsh contrasts that are nearly impossible to fix in post-processing. The sun directly overhead acts like a giant, unflattering overhead light, washing out colors and creating unflattering shadows under eyes, necks, and bodies.
-
2. High Shooting Angles Ruin CompositionMost wildlife photography happens from a jeep, car, or standing position. This elevated viewpoint is one of the biggest composition killers. Your subjects appear small and distant, surrounded by messy, cluttered backgrounds that steal attention from the animal itself. High-angle shots lack the intimacy and connection that make wildlife photos truly engaging. The viewer feels like a distant observer rather than being immersed in the animal's world.
-
3. Soft, Blurry, or Noisy ImagesRelying too heavily on auto mode often leads to disappointing results. Your camera might choose too slow a shutter speed, resulting in motion blur. Or it might crank up the ISO too high, creating grainy, noisy images that look unprofessional. Even exciting wildlife encounters end up looking like casual snapshots when technical settings aren't dialed in properly.
-
4. Gear Confusion and Analysis ParalysisMany photographers convince themselves that expensive equipment is the missing piece. They worry that without a top-tier lens or the latest camera body, their photos will never measure up to professional work they see online. This mindset can be paralyzing, preventing you from improving with the gear you already have.
The Frustrations Are Real (And Universal)
Let me share some thoughts I hear repeatedly from wildlife photographers:
"My photos look perfect on the camera screen but completely dull on my computer."
This is incredibly common. Your camera's LCD screen shows a small, bright preview in often harsh outdoor lighting. What looks sharp and vibrant there can appear soft and muted when viewed at full size on a calibrated monitor.
"Animals never show up at the right time. I'm always stuck with terrible midday light."
It often feels like wildlife operates on its own schedule, ignoring the golden hour completely. But there's actually a pattern here that we can work with.
"Everyone else's photos seem to pop off the screen. Mine always look bland and faded."
When you're scrolling through social media or photography websites, it's easy to feel like everyone else has mastered some secret formula. The truth is, those stunning images are usually the result of specific, learnable techniques.
"Do I really need to spend thousands of rupees (or lakhs!) on gear to match the professionals?"
This is perhaps the most common concern. While gear certainly matters to some degree, I've seen incredible wildlife photos taken with mid-range equipment. More often than not, technique trumps gear.
Let me share a secret: The solution isn't always only expensive equipment. Yes, gear matters, but far more often, it's about mastering your technique and making smart decisions in the field.
7 Wildlife Photography Tips to Elevate Your Work
7 Wildlife Photography Tips: Your Complete Field Guide
Here's where things get exciting. These wildlife photography tips form a straightforward, actionable game plan. You don't need to implement all seven at once — start with just two or three and you'll notice immediate improvements. These wildlife photography tips are tried, tested, and proven in the field.
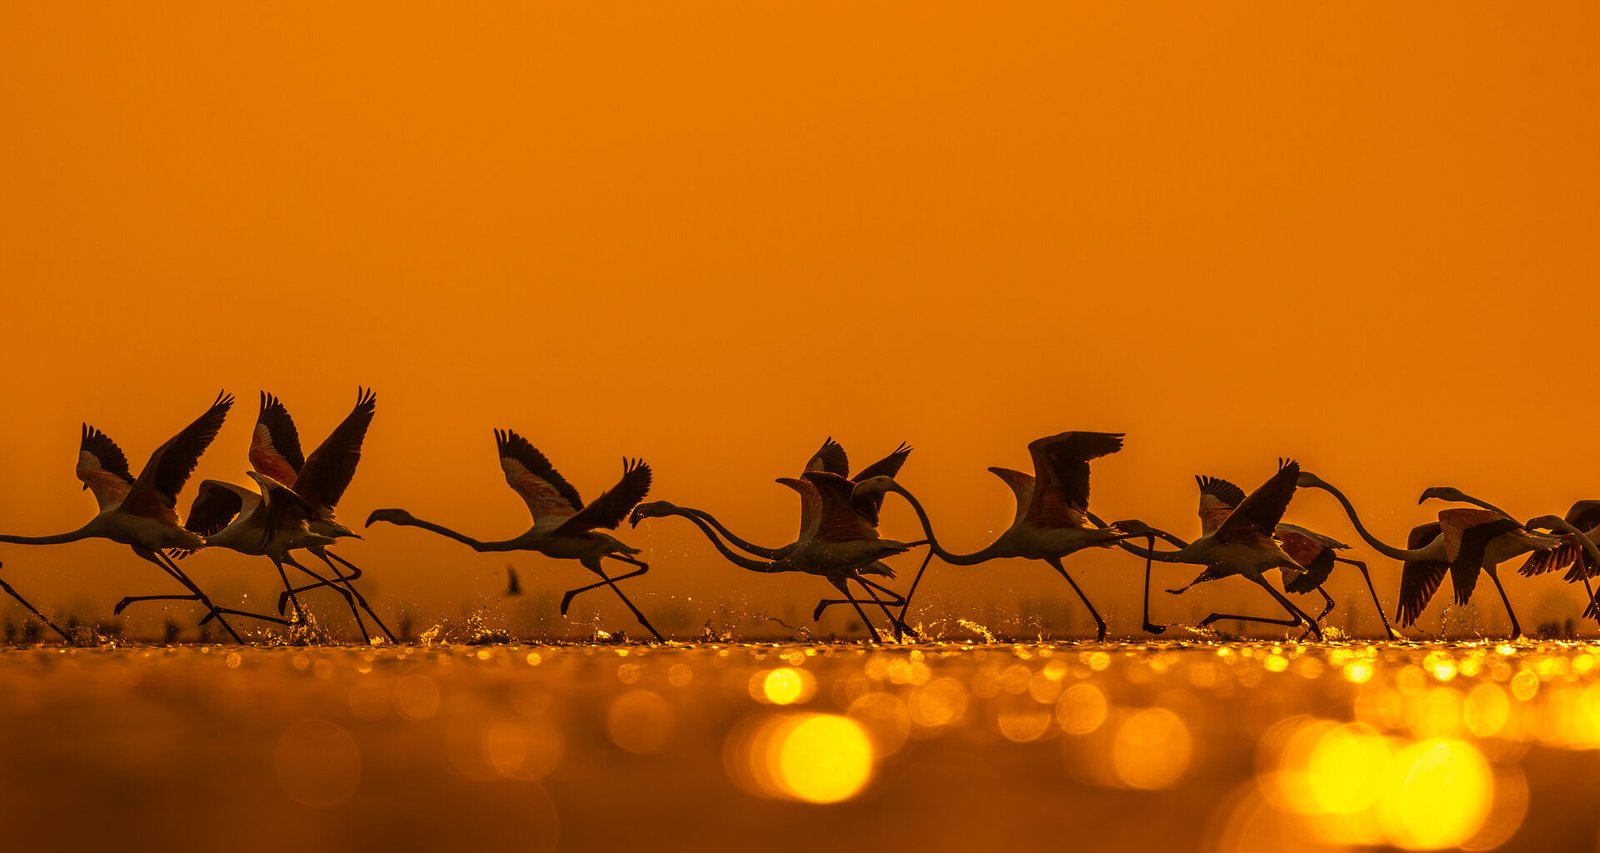
1. Follow the Light, Not the Gear (The Golden Rule)
Why this wildlife photography tips technique works: Early morning and late evening light (often called the "golden hours") provides soft, warm, directional illumination that brings out textures and colors in your subjects. This kind of light adds dimension and depth that harsh midday sun simply cannot provide.
There's a bonus too: animals are naturally more active during these cooler parts of the day. Predators hunt, birds forage, and many species are simply more animated, giving you better behavioral opportunities.
Quick tip you can implement today:
- Arrive at your location 30 to 45 minutes before sunrise
- Stay until 30 minutes after sunset for evening shoots
- Use Auto ISO, but set a maximum cap below your camera's noise threshold (for most modern cameras, this is around ISO 3200-6400; do a quick search for your specific model)
- Be patient. The best light often happens in those fleeting minutes right after sunrise or just before sunset
Camera settings for golden hour:
- Aperture: f/4 to f/8 (depending on your lens and desired depth of field)
- Shutter speed: 1/1000 sec or faster for active animals
- ISO: Auto with a cap at your camera's optimal range
- Metering: Spot or center-weighted
The transformation you'll see by applying this wildlife photography tips principle cannot be overstated. Colors become richer, shadows gain detail, and your subjects appear three-dimensional rather than flat.
2. Go Low and Get Invisible (Change Your Perspective)
Why this wildlife photography tips transforms your images: Shooting from an animal's eye level creates an intimate, immersive perspective. It blurs distracting backgrounds naturally through shallow depth of field and makes your subject the undisputed hero of the frame.
High-angle shots make viewers feel like they're looking down at the animal. Eye-level shots make viewers feel like they're right there with the animal, sharing its world.
Practical implementation:
- Use bean bags on vehicle window frames for stable support
- Invest in a ground-level tripod (remove the center column if needed)
- Use camouflage hides or blinds where permitted
- Even simply kneeling or lying prone can dramatically improve your composition
- In jeep safaris, try to position yourself in a corner seat where you can lower your camera toward the ground
Safety note: Always prioritize your safety and never leave the vehicle in areas where it's prohibited. Many national parks have strict rules for good reason.
What you'll notice immediately:
- Backgrounds become beautifully blurred, creating natural separation
- Your subject's eyes become more prominent and engaging
- The overall feeling of the image shifts from documentary-style to intimate portrait
- Environmental elements (grass, flowers, terrain) frame your subject naturally
EXIF: 1/800 sec at f/6.3, Spot Metering, Exposure Bias: -0.3 EV
I shot the accompanying image of a cheetah in Masai Mara, Kenya, using exactly this technique. By positioning myself low with a Sony a7RV and FE 70-200mm f/2.8 GM II lens, I was able to compress the background and create that dreamy, isolated look that makes the subject pop.
3. Master Your "Safety Settings" (Technical Foundation)
Why this wildlife photography tips matters: Motion blur is the number one technical killer of wildlife shots. Even slight movement from the animal or camera shake can turn a potentially great image into an unusable disappointment.
Higher shutter speeds freeze motion effectively, giving you sharp, professional-looking results.
My recommended starting point:
- Shutter speed: Start at 1/1600 sec for most wildlife. Go faster (1/2000 or 1/2500) for birds in flight or fast-moving animals
- Aperture: Between f/5.6 and f/8 for a good balance of sharpness and depth of field
- Autofocus: Continuous AF (AF-C on most cameras) with eye/animal detection if available
- Drive mode: High-speed continuous (burst mode) to capture sequences
- Image stabilization: Turn it ON for handheld shooting, OFF for tripod use
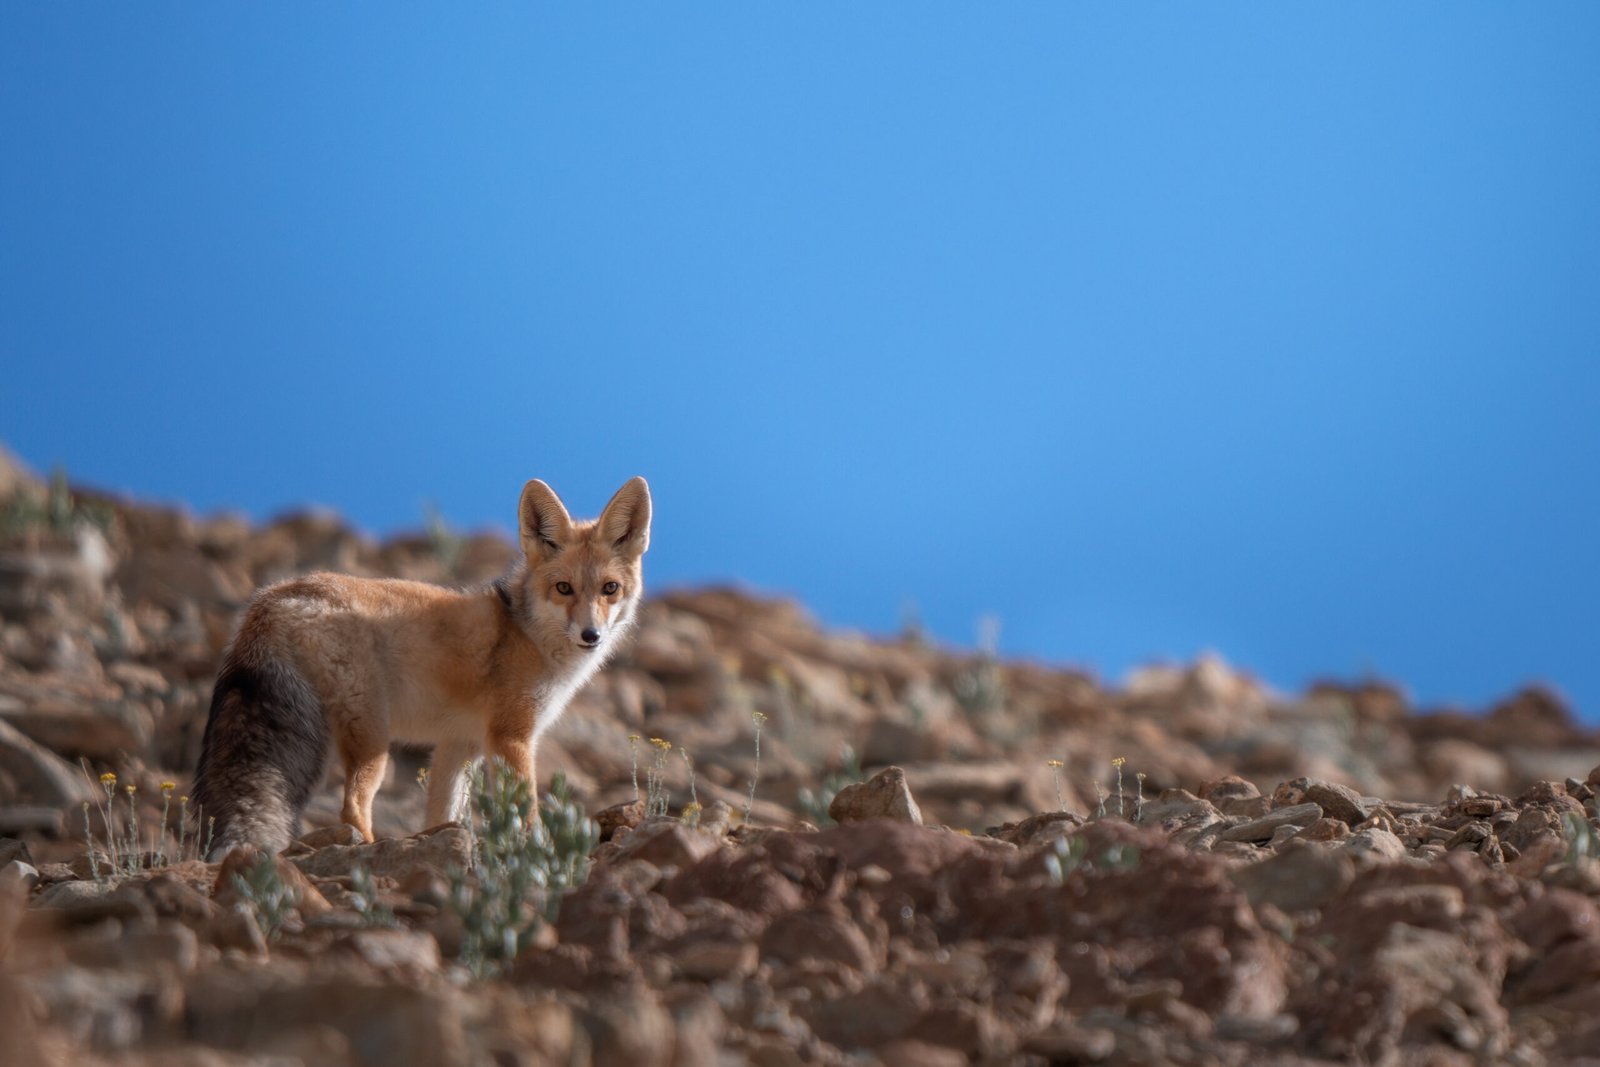
The redfox (Vulpes vulpes) from Ladakh Region
Important note: These are recommendations, not rigid rules. As you gain experience, you'll develop an intuitive feel for when to break these "rules" for creative effect.
Advanced tip for bird photographers: For birds in flight, I often shoot at 1/2500 sec minimum with apertures between f/5.6 and f/8. This ensures tack-sharp feather detail while maintaining reasonable depth of field.
What about slower shutter speeds? Once you've mastered the basics, intentional motion blur (panning) can create stunning artistic effects. But master the fundamentals first before experimenting with creative techniques.
What you'll notice immediately:
- Backgrounds become beautifully blurred, creating natural separation
- Your subject's eyes become more prominent and engaging
- The overall feeling of the image shifts from documentary-style to intimate portrait
- Environmental elements (grass, flowers, terrain) frame your subject naturally
4. Understand Animal Behavior (The Game-Changer)
Why this wildlife photography tips principle is crucial: Knowing what an animal is likely to do next is like having a crystal ball. It reduces wasted shots, increases your keeper rate dramatically, and helps you capture those "wow" moments that others miss.
Wildlife photography isn't just about photography; it's about understanding wildlife.
How to develop this skill:
Spend time just observing: Dedicate entire outings to watching animals without shooting. Notice:
- How they move through their environment
- Where they pause or rest
- What triggers changes in their behavior
- Patterns in their daily routines
- How they interact with other animals
Study behavior patterns:
- Birds often return to the same perch repeatedly
- Many animals have preferred routes or trails
- Predators signal hunting behavior through body language
- Understanding feeding times helps you anticipate action
Read the signs:
- A tensed body often precedes action
- Ears forward on mammals indicate alertness
- Birds "kicking" just before takeoff
- Eye contact between animals signals interaction
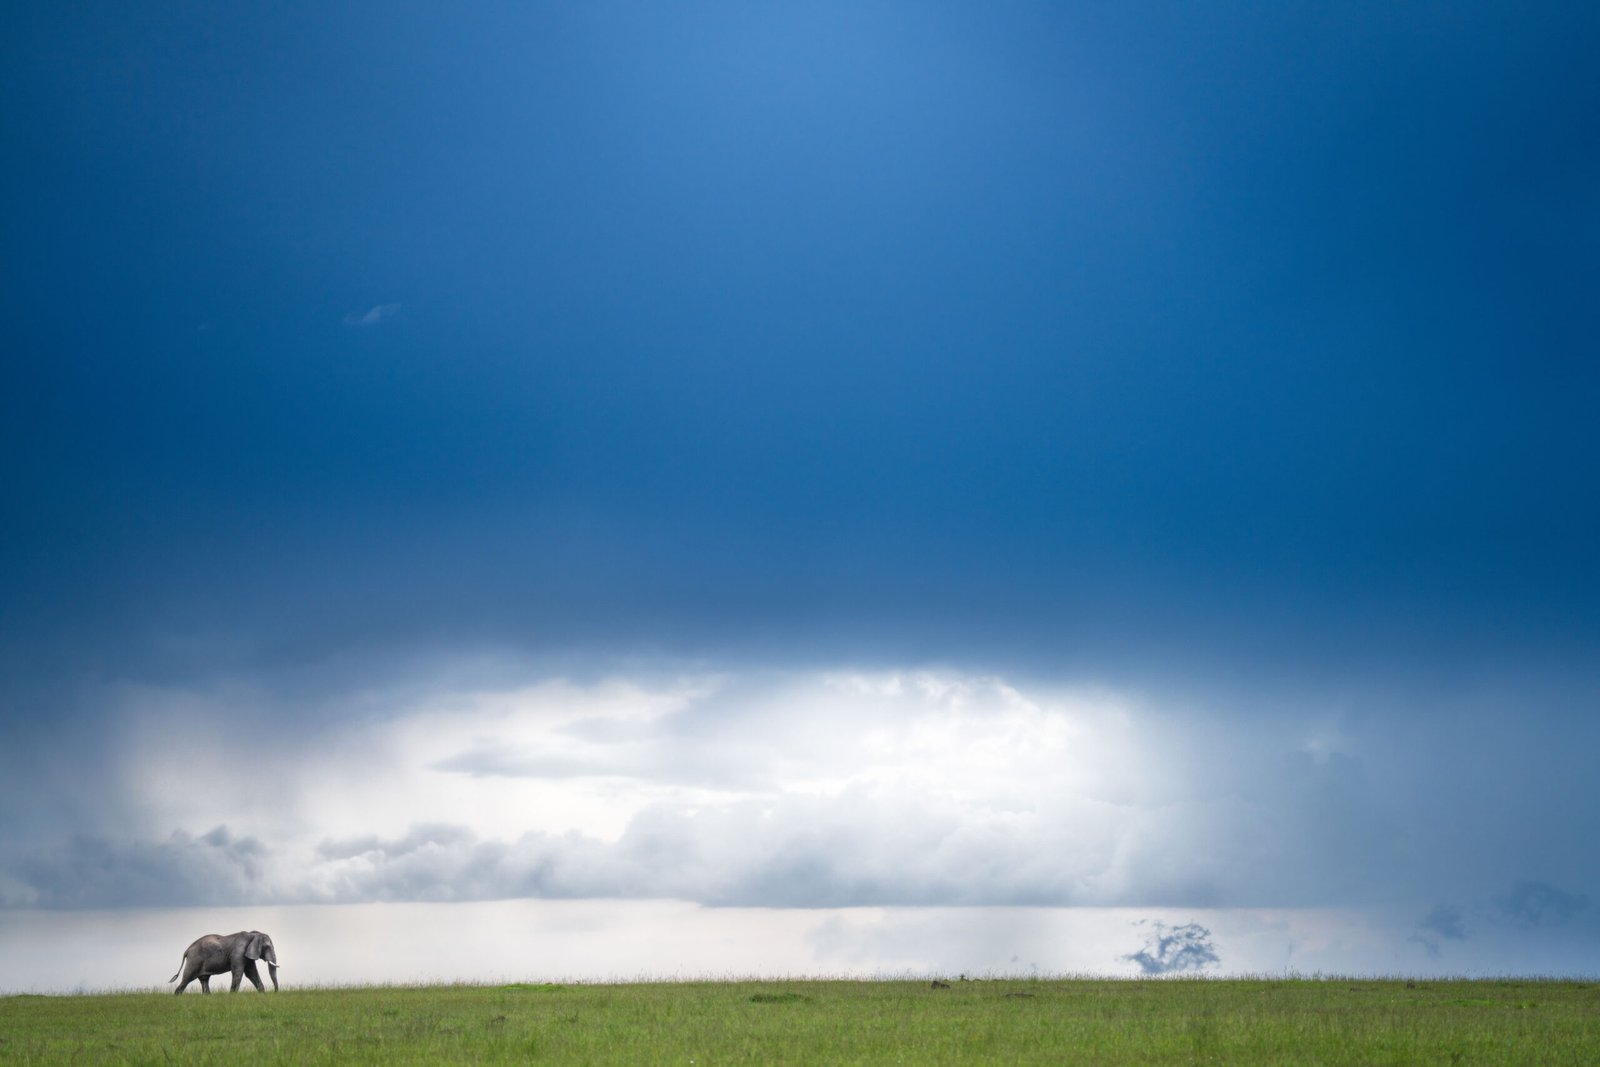
Alone but not lonely, African Elephant from Masai Mara
Practical example: When photographing kingfishers, I noticed they always look down at the water, adjust their position, and then dive. Recognizing this pattern allowed me to anticipate the dive and be ready with my camera before it happened.
Resources to improve:
- Read field guides specific to your subjects
- Watch nature documentaries with a photographer's eye
- Join online forums or local wildlife photography groups
- Spend time with experienced wildlife photographers or naturalists
The more you understand animal behavior, the more your wildlife photography tips will translate from theory to intentional, consistent captures in the field.
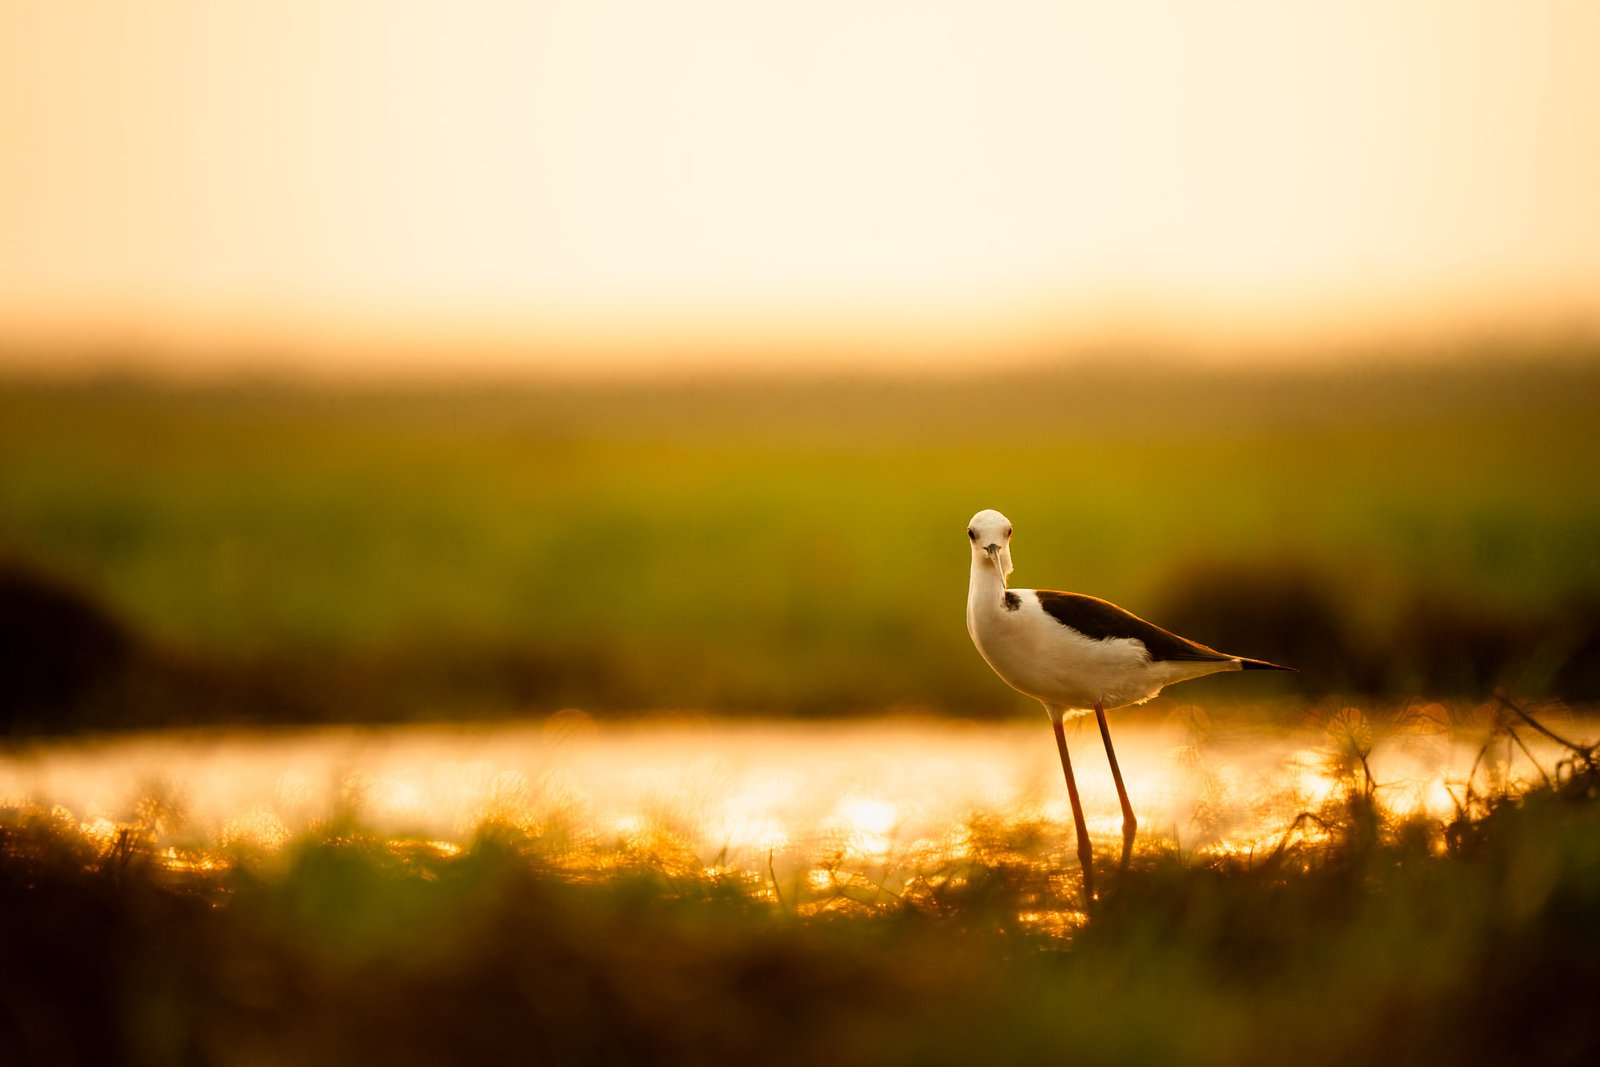
5. Frame First, Crop Later (Composition Mastery)
Why this wildlife photography tips on composition matters more than gear: A well-composed image of a common subject will always outperform a poorly composed image of a rare subject. Clean, intentional framing elevates even ordinary wildlife encounters into compelling photographs.
Fundamental composition principles:
The Rule of Thirds: Position your subject along the imaginary lines that divide your frame into thirds, both horizontally and vertically. Place key elements (like eyes) at the intersection points.
Negative space: Give your subject room to "breathe" in the frame. More importantly, give space in the direction the animal is looking or moving. This creates visual flow and prevents your images from feeling cramped or claustrophobic.
Eliminate distractions: Before clicking, scan your entire frame for:
- Bright spots that draw the eye away from the subject
- Branches or vegetation cutting through important areas
- Cluttered backgrounds that compete for attention
- Horizon lines cutting through your subject awkwardly
Study behavior patterns:
- Birds often return to the same perch repeatedly
- Many animals have preferred routes or trails
- Predators signal hunting behavior through body language
- Understanding feeding times helps you anticipate action
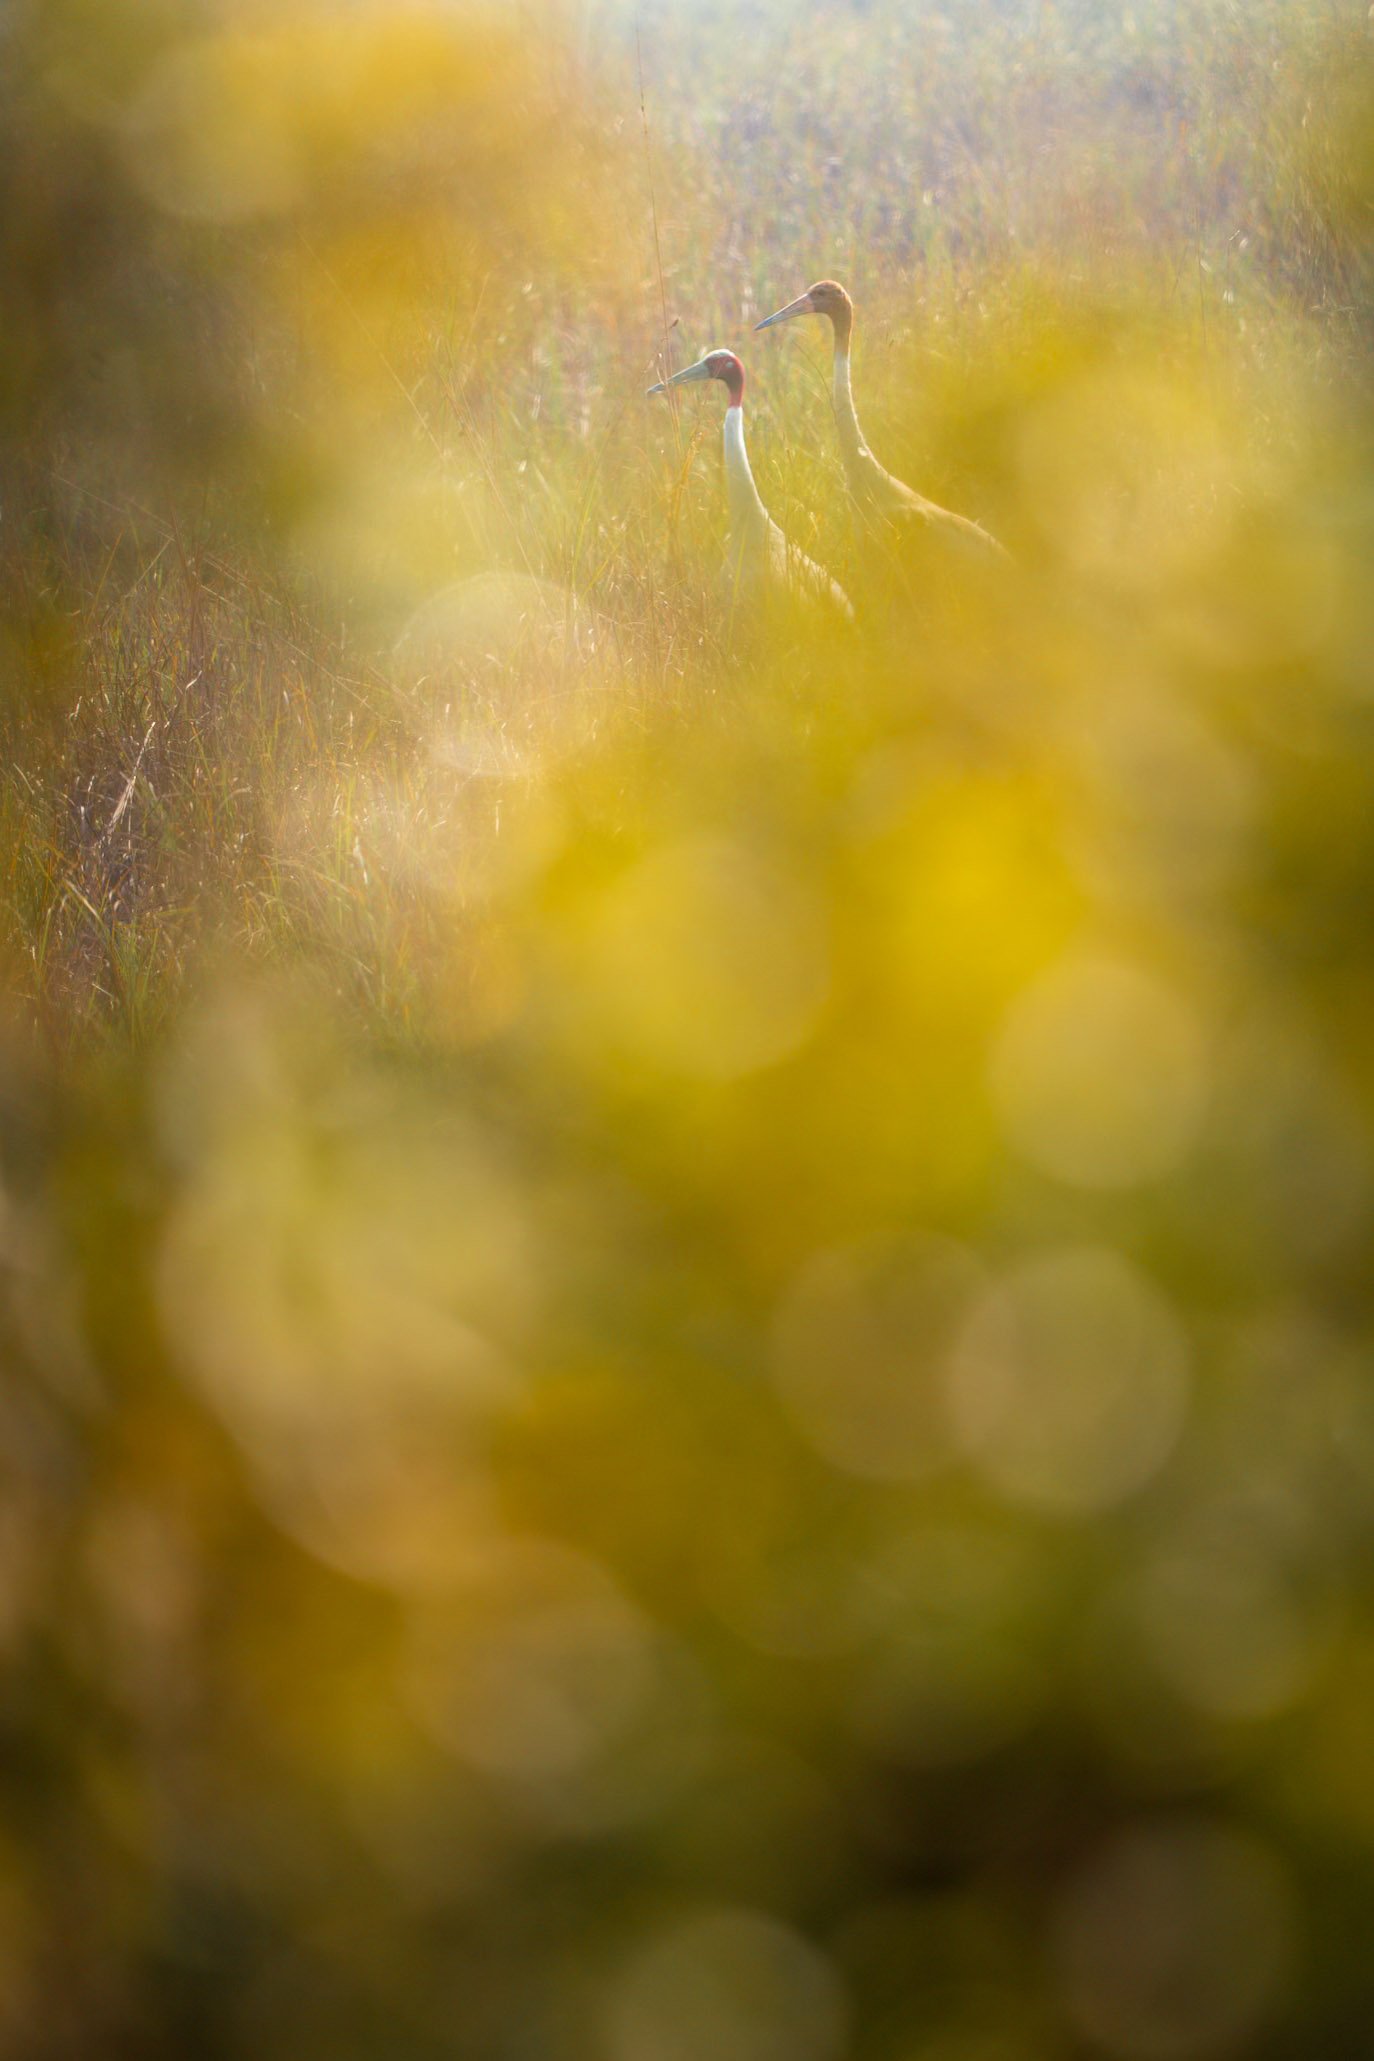
Using foreground distractions and light to create compelling compositions
Practical field technique: Don't just lock onto your subject and shoot. Take a moment to:
- 1. Move slightly left or right
- 2. Raise or lower your position
- 3. Wait for the animal to move to a cleaner background
- 4. Zoom in or out to simplify the composition
The "cleaner frame" exercise: Before each shot, ask yourself: "Can I move to eliminate that distraction?" Often, shifting just a meter or two makes all the difference.
Leading lines and framing: Use environmental elements to guide the viewer's eye:
- Fallen logs leading to your subject
- Branches framing the animal naturally
- Paths or shorelines creating visual flow
I've included an example image showing how foreground elements and light can create depth and lead the eye to your subject. These wildlife photography tips on compositional layers transform simple wildlife portraits into immersive scenes.
Remember: You can always crop later, but you can't add back what wasn't in your frame to begin with. Shoot with intention, but also shoot loose enough to give yourself options in post-processing.
6. Edit Thoughtfully (Digital Darkroom Magic)
Why this wildlife photography tips on post-processing is essential: Even the best wildlife photographers edit their images. The goal isn't to create something fake, but to bring the image closer to what you saw and felt in the field. Your camera's sensor captures information differently than your eye perceives it.
Minor, thoughtful adjustments can recover lost details, enhance your subject, and create the emotional impact you experienced in person.
My editing workflow (using Lightroom Classic):
Global adjustments (affects the entire image):
- 1. White balance: Correct or warm up/cool down as needed
- 2. Exposure: Brighten if underexposed, but don't blow out highlights
- 3. Contrast: Add punch, but avoid the "HDR look"
- 4. Highlights/Shadows: Recover detail in bright and dark areas
- 5. Whites/Blacks: Set your true white and black points
- 6. Vibrance/Saturation: Boost colors naturally (vibrance is more subtle)
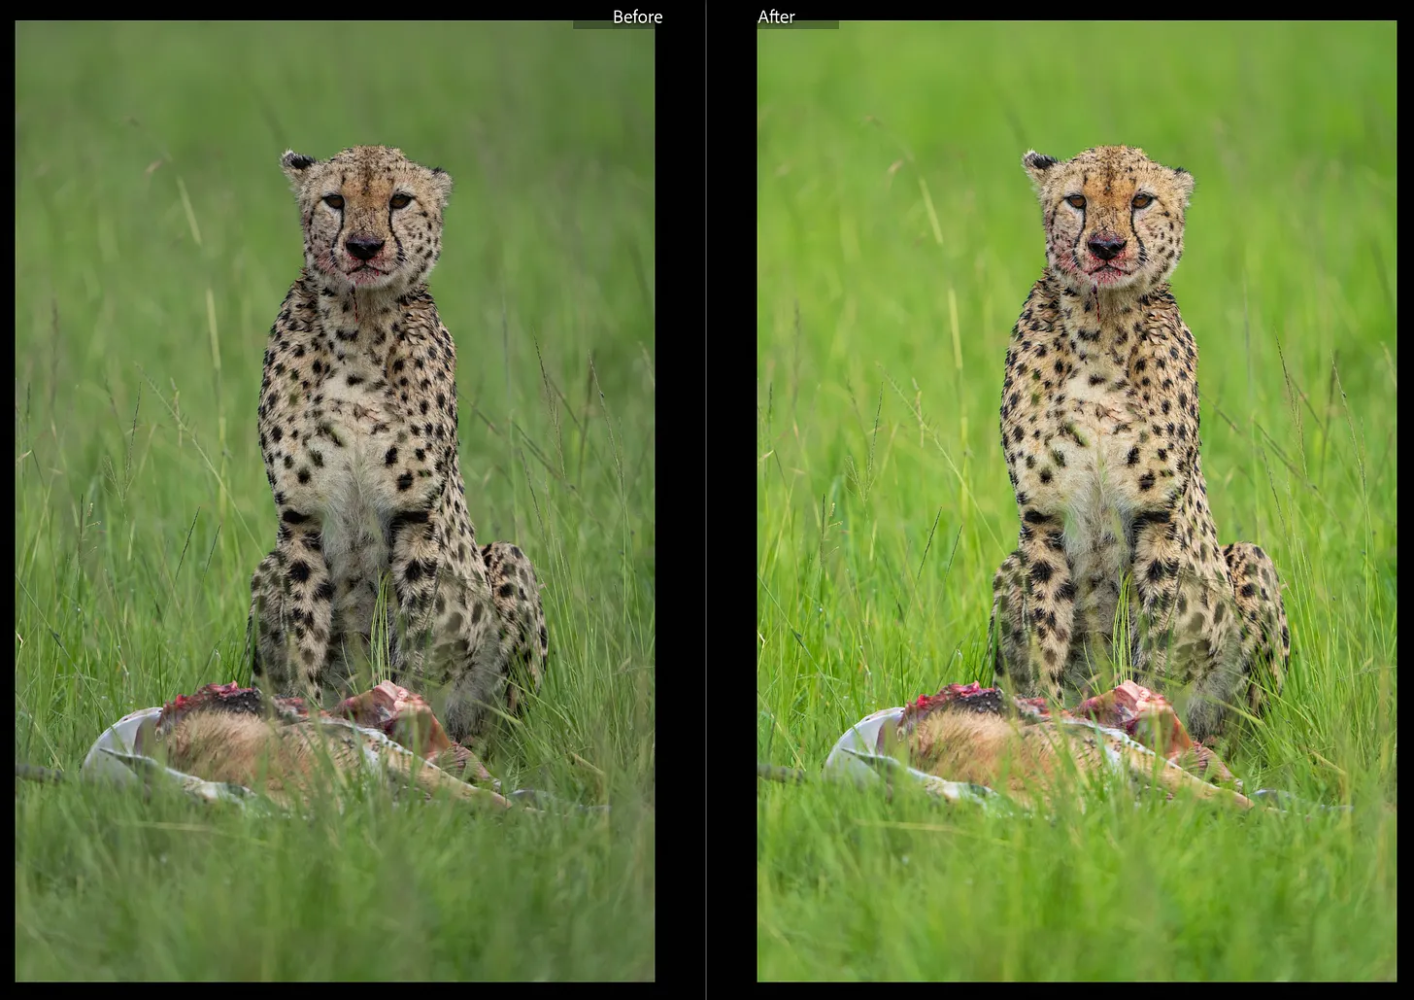
Simple colour profile change and notice the difference it can make
Local adjustments (specific areas only):
- 1. Brighten the eyes: Use a radial filter or brush to subtly lighten eyes, making them more engaging
- 2. Reduce hot spots: Tone down overly bright areas on the subject
- 3. Add subtle vignetting: Darkens edges slightly, drawing focus to the center
- 4. Sharpen selectively: Apply extra sharpening to key areas like eyes and fur
Color profiles for extra impact: Try switching from Adobe Color to:
- Adobe Vivid: Boosts saturation and contrast
- Adobe Landscape: Enhances greens and blues naturally
The difference can be dramatic. I've included a before-and-after example showing how a simple color profile change transforms an image.
Important editing principles:
- Less is more: If it looks over-edited, it probably is
- Maintain realism: Your goal is to enhance, not fabricate
- Consistency: Develop a recognizable style across your portfolio
- Learn from others: Study how photographers you admire process their work
Tools beyond Lightroom:
- Photoshop: For advanced retouching and compositing
- Topaz DeNoise: Excellent for cleaning up high-ISO images
- Luminar Neo: AI-powered adjustments for sky, subject, and detail enhancement
The editing controversy in wildlife photography tips: Some wildlife photography competitions have strict rules about editing. Always check guidelines if you plan to enter contests. For personal work and portfolios, thoughtful enhancement is standard practice.
7. Mindset Shift - Technique Beats Gear (Every Time)
This is perhaps the most important section of wildlife photography tips in this entire guide.
The truth about gear: Yes, professional equipment offers advantages: faster autofocus, better low-light performance, longer reach, and superior image quality. But stunning wildlife images rarely come from gear alone.
They're built from:
- Patience: Waiting for the right moment, the right light, the right behavior
- Light awareness: Being in the right place at the right time
- Smart composition: Knowing how to arrange elements within your frame
- Behavioral understanding: Predicting what will happen next
- Technical mastery: Knowing your camera inside and out
Real-world wildlife photography tips example: I've seen photographers with entry-level DSLRs and kit lenses capture images that outshine work done with flagship cameras and expensive telephoto lenses. The difference? They understood light, composition, and timing.
Your pre-shot checklist: Before pressing the shutter, quickly run through these questions:
- ✓ Is the light right? Am I shooting during golden hour or in good conditions?
- ✓ Am I at the best angle? Can I get lower or change my position for better perspective?
- ✓ Will my settings freeze the action? Is my shutter speed fast enough?
- ✓ Am I anticipating the animal's behavior? What's likely to happen next?
- ✓ Is my frame distraction-free? Can I simplify the composition?
Answer "yes" to most of these wildlife photography tips, and you're well on your way to images that capture attention and hearts.
When gear actually matters:
- When you need serious reach (photographing distant or dangerous animals)
- In extremely low light situations
- When you need professional-level autofocus for fast action
- For print sales or commercial work requiring maximum resolution
When technique matters more:
- Learning to use light effectively
- Developing compositional skills
- Understanding animal behavior
- Mastering your camera's capabilities
- Building patience and field craft
Investment priority:If you're serious about wildlife photography:
- First: Master your current gear completely
- Second: Invest in field time and experience
- Third: Consider workshops or mentorship
- Fourth: Upgrade your lens (glass matters more than the camera body)
- Fifth: Upgrade your camera body only when you're limited by it
The bottom line on wildlife photography tips: Great wildlife photography is 70% field craft and technique, 20% timing and luck, and only 10% equipment. Focus on developing that 70% before worrying too much about gear upgrades.
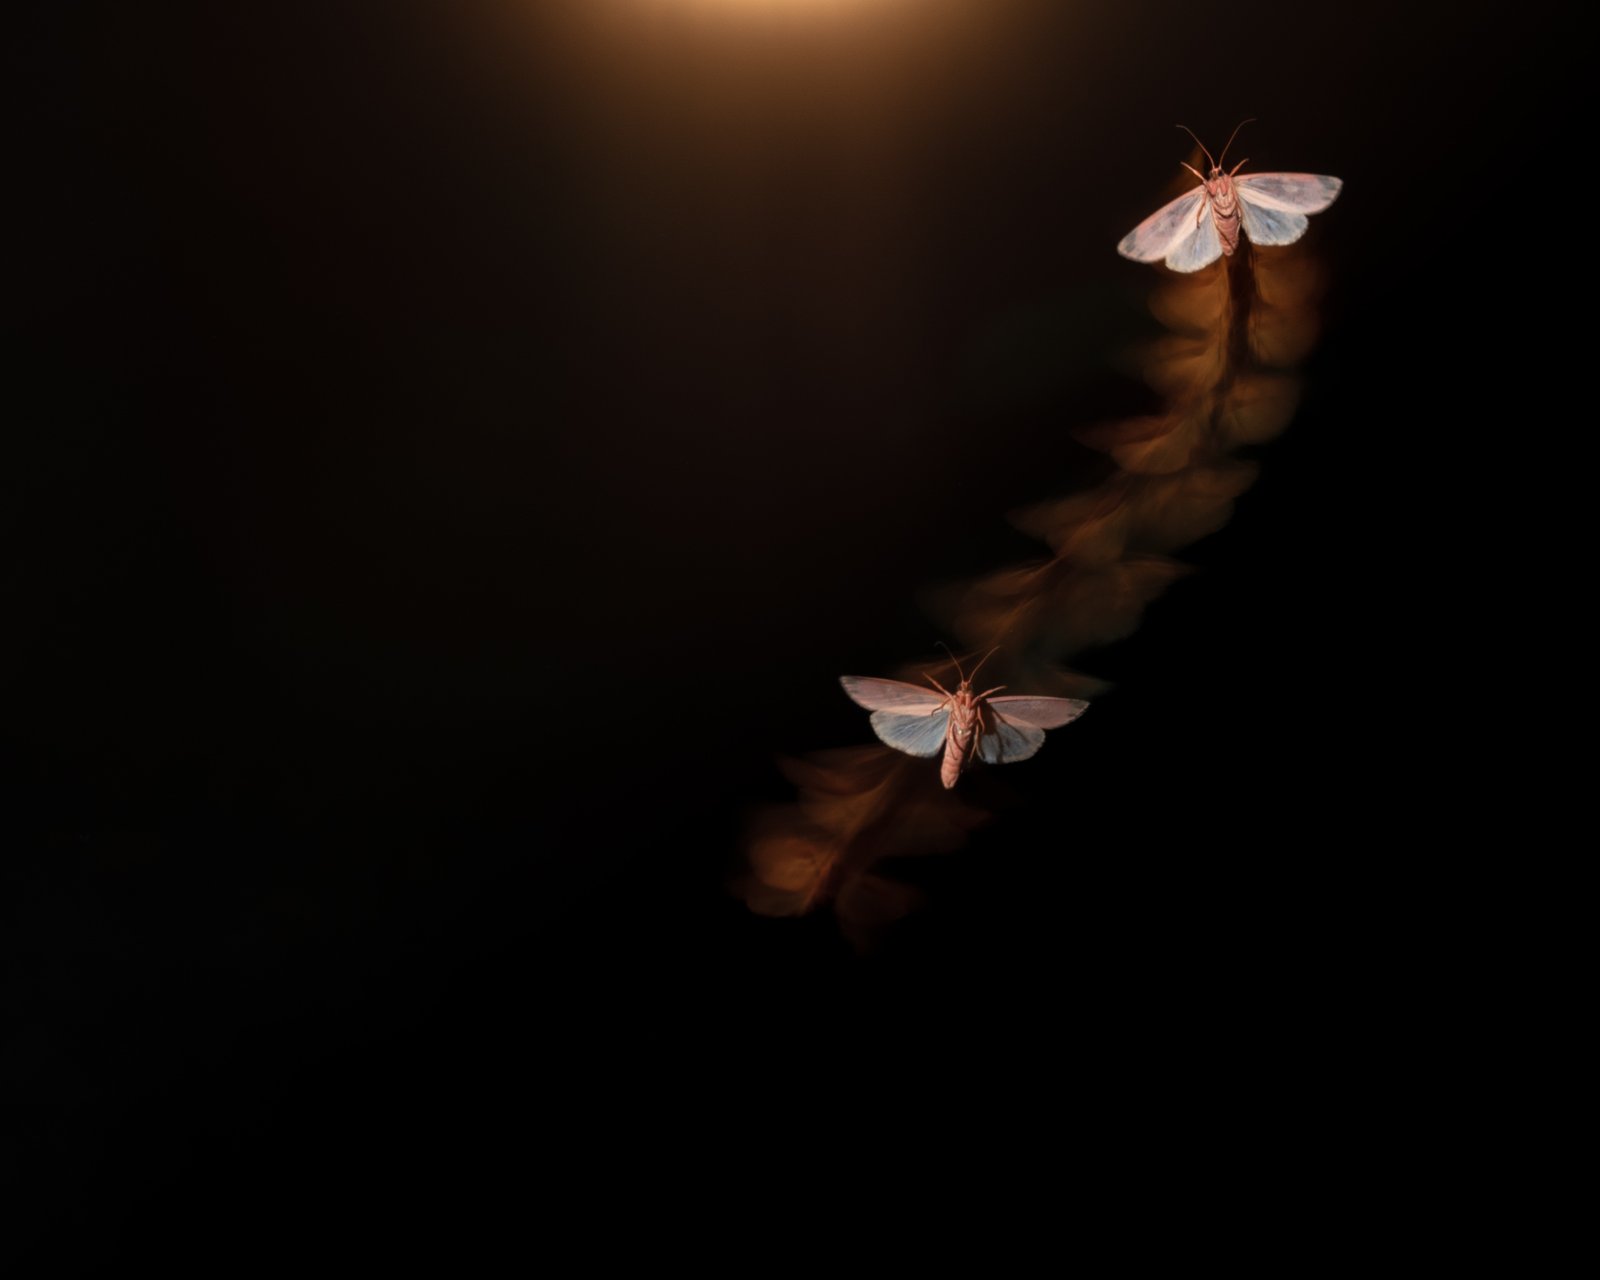
Nature's calligraphy | A single click single moth shot
Final Thoughts and Your Action Plan
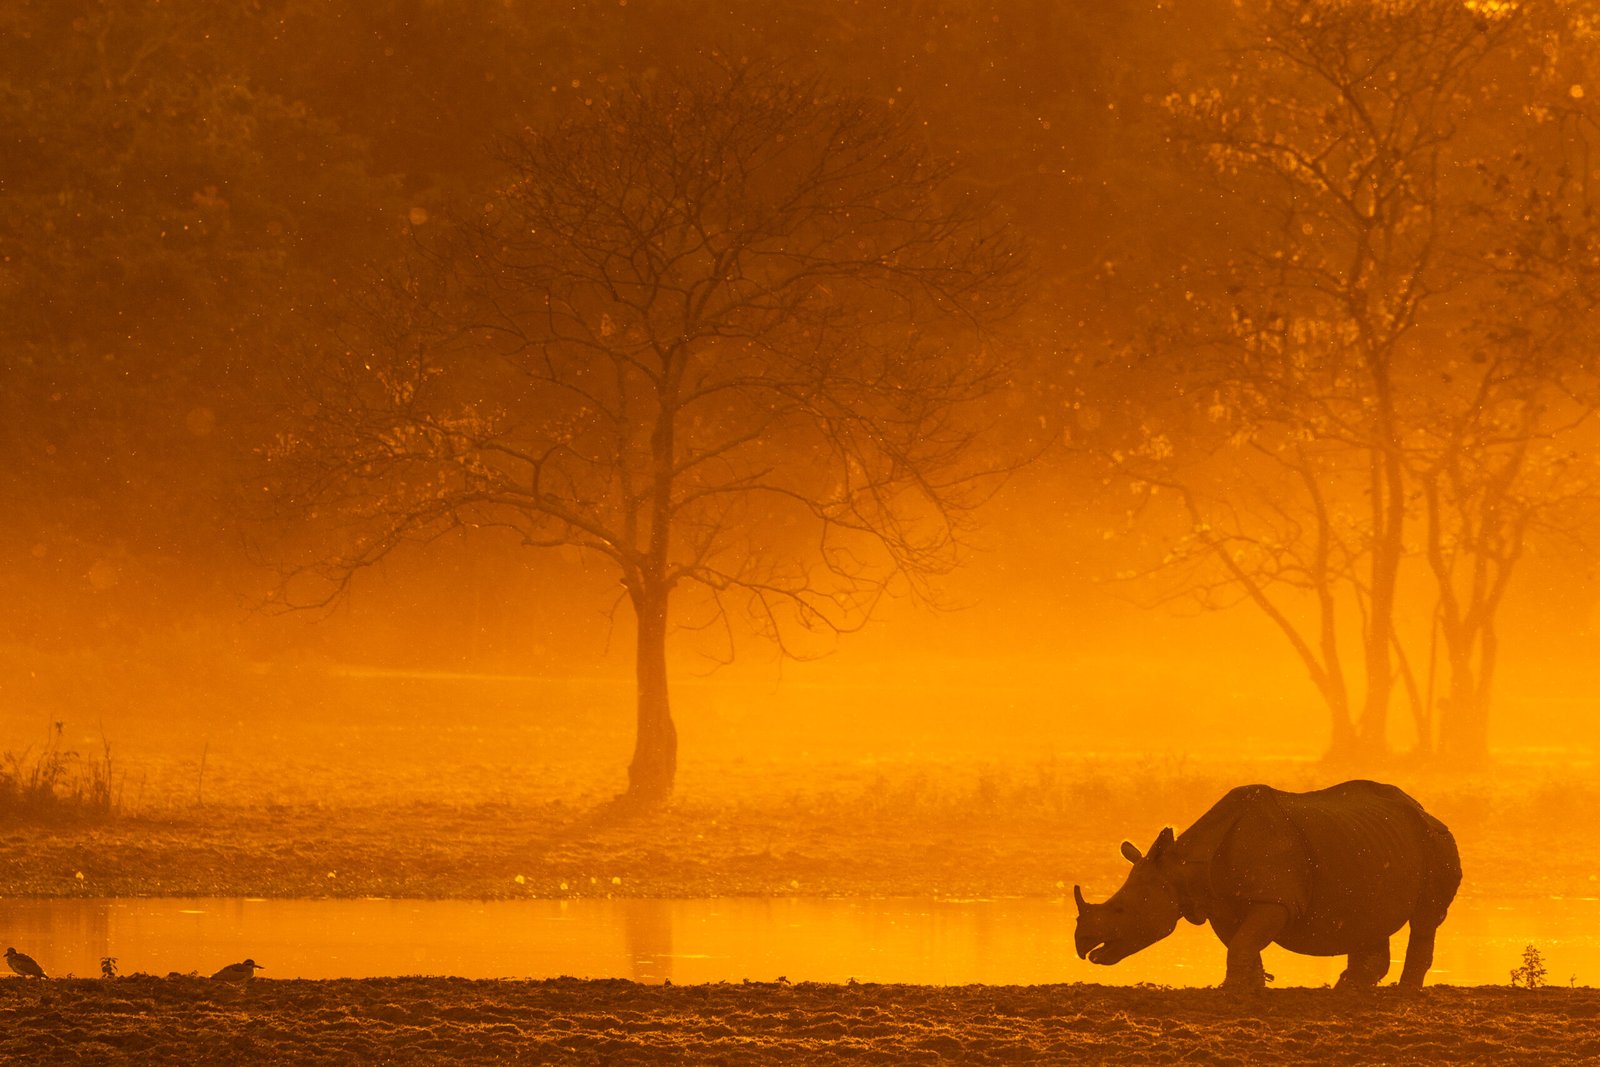
You don't need exotic international safaris or expensive professional equipment to apply these wildlife photography tips and create memorable, compelling images. Whether you're photographing tigers in Tadoba, one-horned rhinos in Kaziranga National Park, thousands of birds in Bharatpur, or even common species at your local bird sanctuary, these seven wildlife photography tips can transform your photography from average to exceptional. For hands-on practice with expert guidance, explore my wildlife photography workshops in India.
Your Immediate Action Steps:
This Week:
This Month:
Ongoing:
- 1. Study successful wildlife images and analyze what makes them work
- 2. Join photography communities to share work and get feedback
- 3. Keep learning about the animals you photograph
- 4. Most importantly: Get out there and shoot!
Join the Conversation
I'd love to hear about your wildlife photography journey. What wildlife photography tips or techniques work particularly well for you? What challenges are you facing? What breakthroughs have you experienced?
Drop a comment below and let's learn from each other. Wildlife photography is as much about community and shared knowledge as it is about individual skill. For more field stories, check out my post on photographing white rhinos at Lake Nakuru — a reminder that patience and preparation are the best wildlife photography tips of all.
Frequently Asked Questions (FAQ)
-
What camera settings should I use for wildlife photography?These wildlife photography tips for camera settings are a solid starting point: shutter speed at 1/1600 sec or faster, aperture between f/5.6 and f/8, and Auto ISO with a cap at your camera's optimal range. Use continuous autofocus (AF-C) and burst mode.
-
Do I need an expensive camera for wildlife photography?No. These wildlife photography tips prove that technique, lighting, and composition matter far more than equipment. Master your current gear before upgrading — the best wildlife photography tips are about field craft, not price tags.
-
What's the best time of day for wildlife photography?One of the most important wildlife photography tips: shoot during golden hours. Early morning (30–45 min before/after sunrise) and late evening (before/after sunset) provide the best light and most active animal behaviour.
-
How can I get sharper wildlife photos?Key wildlife photography tips for sharper images: use shutter speeds of 1/1600 sec or higher, continuous autofocus with tracking, and shoot at your lens's optimal aperture (f/5.6 to f/8). Proper stabilisation technique also makes a huge difference.
-
Should I shoot in RAW or JPEG for wildlife?A: Always shoot in RAW format. It captures more information and gives you significantly more flexibility in post-processing to recover details and adjust exposure.
-
How do I photograph birds in flight?Use shutter speeds of 1/2000 sec or faster, continuous autofocus with tracking, burst mode, and practice panning smoothly. Start with slower-moving birds before attempting fast-flying species.
-
What focal length do I need for wildlife photography?A: For most wildlife, a 400mm to 600mm focal length (or equivalent) is ideal. However, excellent work can be done with 200-300mm lenses depending on the subject and how close you can get.

One thought on “How to Transform Your Wildlife Photos from Average to Stunning (7 Proven Tips)”
Mahak
October 3, 2025This is a comprehensive list of tips which can be practically implemented. Thanks.