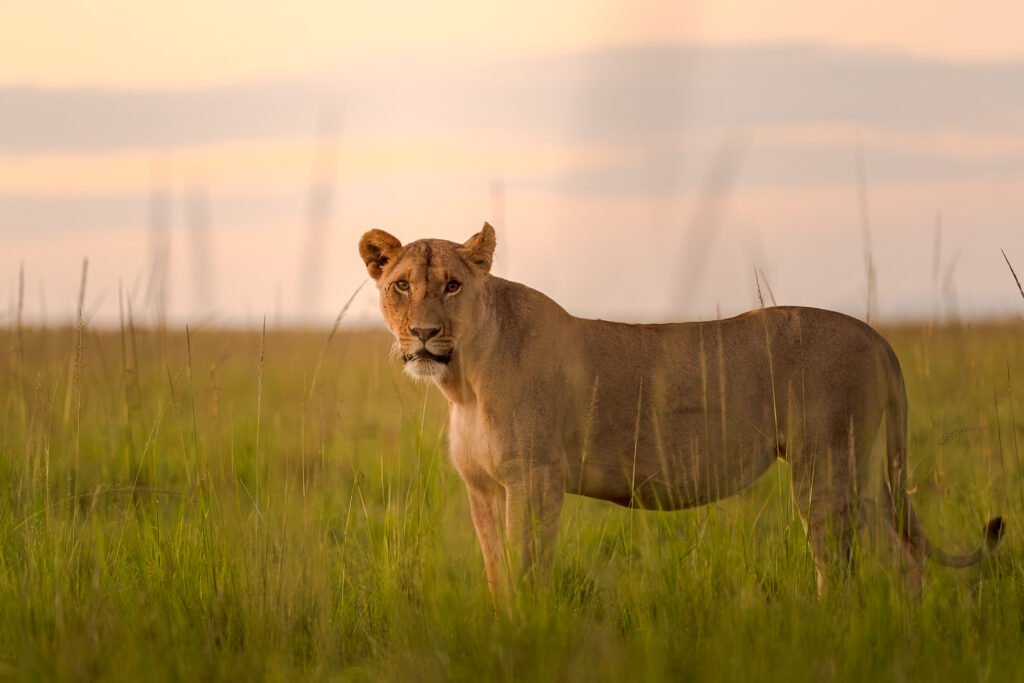
That Sinking Feeling
If your wildlife photos are blurry, you know that sinking feeling when you’ve waited 45 minutes in the cold. The tiger finally comes out of the bush. You raise your camera, hold your breath, and click. You check the LCD screen, and your heart sinks! “It’s blurry again.”
If you are constantly wondering how to fix blurry wildlife photos, take a deep breath. You’re not alone. Every wildlife photographer, including myself, has struggled to capture those perfectly sharp photos. The good news? If your wildlife photos are blurry, it isn’t a sign of failure
As a UX designer turned photographer, I’ve learned that mastering your wildlife photography camera settings is just a design challenge waiting for a systematic solution. Let’s figure out how to fix blurry wildlife photos together.
Why Your Wildlife Photos Are Blurry (The 3 Main Culprits)
Before we fix the problem, let’s understand it. Blurry wildlife photos usually come from one of these three issues:
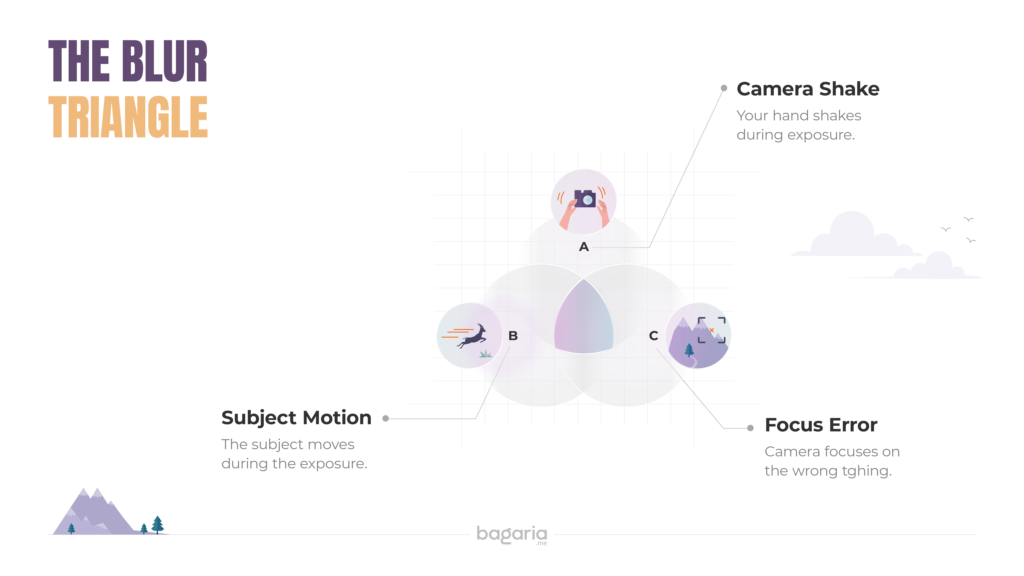
- Camera Shake: Your hands move during exposure
- Subject Motion: The animal moves during exposure
- Focus Error: Camera focuses on the wrong thingLet’s tackle each one. One at a time
Solution 1: Fix Camera Shake with Faster Shutter Speeds
The Problem: Even when you’re standing still, your hands naturally shake. At slow shutter speeds, this movement is exactly why your wildlife photos are blurry.
The Fix: Use a faster shutter speed.
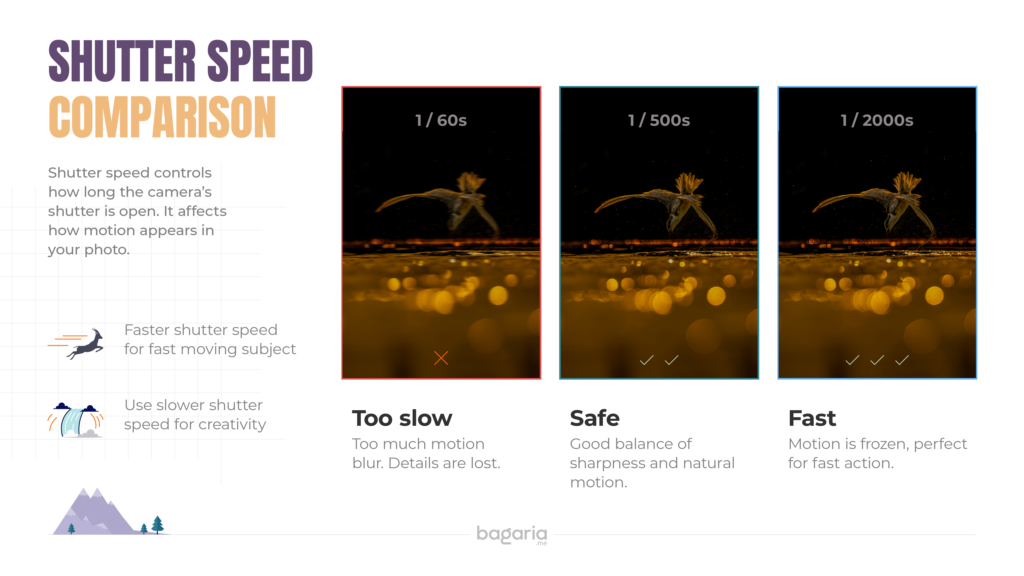
For handheld wildlife photography, never go slower than 1/(focal length × crop factor).
Examples:
- 300mm lens on APS-C camera (1.5× crop): 1/500s minimum
- 500mm lens on full-frame: 1/500s minimum
- 600mm lens on APS-C (1.5× crop): 1/1000s minimum
For birds in flight or active mammals: Start at 1/1000s or faster.
Pro Tip from UX Thinking: Think of shutter speed like a “freeze frame” button. The faster you press it, the less time movement has to ruin your shot.
Solution 2: Master Your Autofocus Settings for Wildlife
The Problem: Your camera doesn’t know which part of the scene you want sharp. Left to its own devices, it often chooses wrong.
The Fix: Take control of your autofocus.
Step-by-Step Focus Strategy:
1. Use Single Point AF (Not Auto-Area)
- Go into your camera menu
- Change AF Area Mode from “Auto” to “Single Point” or “Dynamic Area”
- This tells the camera: “Focus ONLY where I tell you”
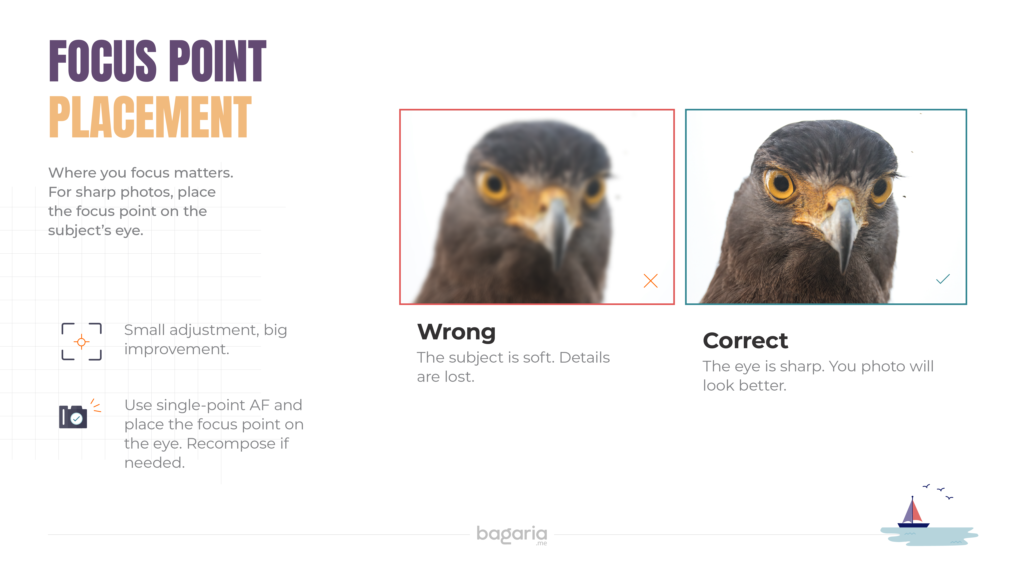
2. Place the Focus Point on the Eye
- For sharp wildlife photos, the eye MUST be in focus
- Move your focus point to cover the animal’s eye
If the eye is sharp, the photo works, even if the tail is soft (most of tge time)
3. Use Continuous AF (AI Servo/AF-C) for Moving Subjects
- Stationary animal? Use Single AF (One-Shot/AF-S)
- Moving animal or bird? Use Continuous AF (AI Servo/AF-C)
- This tells the camera to keep tracking focus as the subject moves
4. Enable Back-Button Focus (Game Changer!)
- Separate focusing from the shutter button
- Assign focus to a button on the back of your camera
- This prevents the camera from refocusing when you press the shutter
- This single change improved my success rate by 40%
P.S. This is turned on by default for some brands, like Sony; for others, in most cases, you can create a custom button. Comment your camera model, and I will help you with the exact steps.
Solution 3: Stabilise Your Body and Gear
The Problem: Even with fast shutter speeds, poor technique introduces shake.
The Fix: Become a human tripod.
Do This:
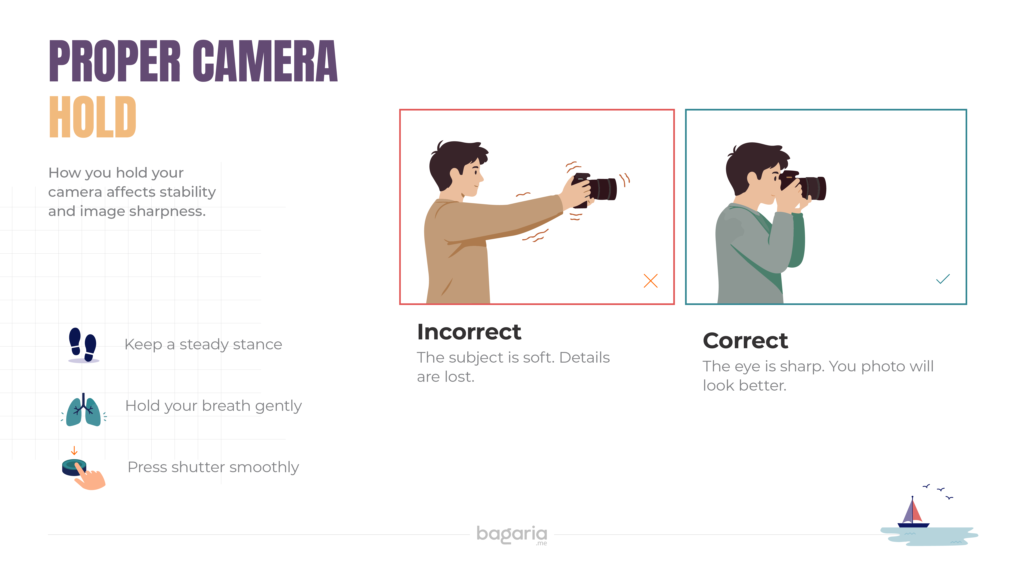
- Tuck your elbows tightly against your ribcage [Refer to the above diagram]
- Left hand supports the lens from underneath (palm up)
- The right hand grips the camera body firmly
- Stand with feet shoulder-width apart for balance
- Breathe out gently as you press the shutter softly
- Use your viewfinder, not live view (adds a third point of contact)
When to Use a Monopod/Tripod/Beanbag:
- Focal length > 400mm
- Shutter speed < 1/500s
- You’re waiting for extended periods (hides/blinds)
- Low-light situations
P.S. Technically speaking, you should always prefer a tripod for capturing photos if space and time allow you, and you can manage to get the desired angle as per your framing.
Solution 4: Don’t Fear ISO
The Problem: You’re in shade or early morning. To get a fast shutter speed, you need to raise ISO, but you’re worried about noise.
The Fix: A sharp, noisy photo is better than a blurry, “clean” one.
The Hierarchy of Importance:
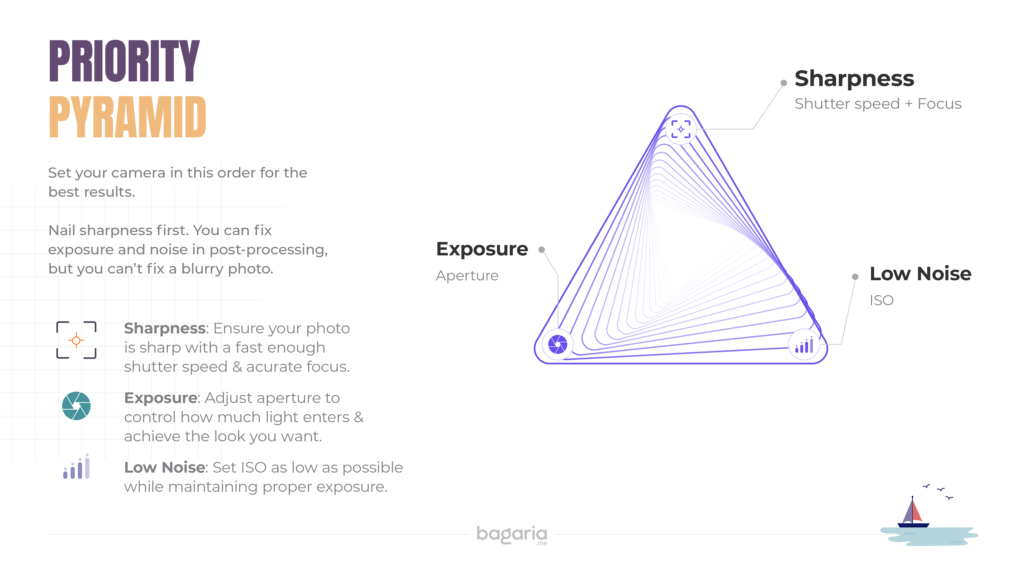
Modern cameras handle high ISO beautifully. My rule:
- ISO 800-1,600: Perfectly usable on any modern camera
- ISO 3,200-6,400: Acceptable for most wildlife work
- ISO 12,800+: Use when necessary; sharpness first!
Remember: You can reduce noise in post-processing. You cannot fix blurry wildlife photos caused by motion blur.
Your Field Checklist: The 5-Second Pre-Shot Routine
Before you press the shutter, run through this mental checklist:
S.H.A.R.P. Framework
- Shutter speed fast enough? (1/500s minimum, 1/1000s for action)
- Hand position stable? (Elbows in, breathe out)
- AF mode correct? (Single for still, Continuous for moving)
- Right focus point? (On the eye!)
- Push ISO if needed? (Sharp > Clean)
Practice this until it becomes muscle memory.
The UX Designer’s Perspective: Think in Systems
Here’s what my background in user experience taught me about photography:
Problems aren’t random; they’re systematic. Blurry photos aren’t bad luck. They’re the result of specific, identifiable factors. When you approach photography like a designer:
- Identify the pain point (blur)
- Map the user journey (your shooting process)
- Test solutions (adjust one variable at a time)
- Iterate (learn from each shot)
This systematic approach transformed my success rate from 20% to 70% in six months.

Your Action Plan for the Next Shoot
Before you go:
- Set your camera to Shutter Priority (Tv/S) or Manual mode
- Set the minimum shutter speed to 1/500s
- Enable Continuous AF (AI Servo/AF-C)
- Switch to Single-Point AF
- Set Auto ISO with a max limit of 6400
In the field:
- Practice the S.H.A.R.P. checklist before every shot
- Focus on the eye, always
- Tuck those elbows!
- Review images at 100% zoom to check sharpness
- Adjust one setting at a time when something’s wrong
After the shoot:
- Identify your blurry wildlife photos and diagnose why
- Celebrate your sharpest photo and note what worked
- Repeat
If You’d Like to Go Deeper
I know the journey from blurry to sharp photos can feel lonely. If you’d like support along the way, here are a few ways we can connect:
Wildlife Photography Coaching If you’re working on composition, storytelling, or just want someone to review your images and help you troubleshoot, I’m happy to help.
Design & Leadership Mentoring For fellow designers navigating research, team dynamics, or strategic challenges; I’ve walked that path and love paying it forward.
Cross-Disciplinary Conversations Curious about how design thinking applies to photography (or vice versa)? Let’s talk. Some of my best insights come from these conversations.
Ways to Connect:
📧 Email me directly: abhibagaria@gmail.com I read every message and do my best to respond.
📅 Free 30-minute call: Book a time. No pitch, no pressure. Just a conversation about where you are and where you want to go.
💬 Join our community: Free WhatsApp Group A supportive space to share wins, ask questions, and learn together.
Know someone struggling with blurry wildlife photos? Feel free to share this article with them. Sometimes the right tip at the right time makes all the difference.